Friday, June 4, 2010

{Spinach & Chicken stuffed shells}


This recipe was absolutely delicious. This one was bookmarked for sure. I found this recipe over at Sisters Cafe. They have some amazing stuff. Check them out! 

(This recipe makes a lot so I halved it)


Chicken and Spinach Stuffed Shells

44 uncooked jumbo pasta shells (That’s about one and one-half 12-oz boxes)

2 c chopped cooked chicken
2 c fresh chopped spinach

1 onion, chopped

2 cloves garlic, minced

1 (15oz) container ricotta cheese

2 (8oz) packages cream cheese, softened

1 (5oz) package shredded Parmesan cheese (about 1 2/3 c.)

1 large egg, lightly beaten

1 Tb dried parsley flakes

1 tsp Italian seasoning

1/2 tsp salt

1/2 tsp pepper

2 c shredded mozzarella cheese, divided

1 (26oz) jar prepared spaghetti sauce (any variety)


Cook shells according to package directions (be sure to stir every once in awhile so they don't stick to the bottom of the pan and tear apart); drain and set aside.
Preheat oven to 350°. Lightly grease 2 13x9x2inch baking dishes.
In a large bowl, combine chicken and all the rest of the ingredients except mozzarella and spaghetti sauce. Stir in 1 cup mozzarella. Spoon into shells. Spread half of spaghetti sauce into prepared baking dishes. Arrange shells over sauce; top with remaining sauce. Cover tightly with heavy-duty aluminum foil. Bake, covered, for 40 minutes. Uncover, sprinkle with remaining 1 cup mozzarella. Bake for 5 to 10 more minutes.
Makes 8-10 servings.


Let it be known that I simply don't take pretty pictures.

That's all.

Good night!

Pencil holder

What to do with those old formula cans...???

Turn them into a pencil holder of course.

:)


Supplies:
Formula can
Scrapbook paper
Modge Podge
Paper roses
Tulle
Burlap
Glue gun
A tag for the label (I cut mine out with my cricut- but it can easily be made)

Steps:
1. Modge Podge scrapbook paper around can. Apply Modge Podge over paper
2. Wrap Tulle around and fit through hole of the tag- tie a bow
3. Tie Burlap around bow
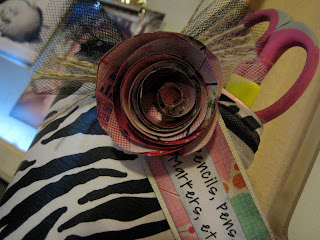
4. Glue paper rose to the burlap and tulle
5. Print out label

And. Done. 

So easy! Enjoy!

Paper Roses!

I know, I know. I'm sure you've seen these all over blog land! I saw this idea awhile ago but just recently got around to making a few. I don't know why it took me so long. They're so easy to make and it took like 3 minutes! My kind of craft ;) If you want to learn how, you can go HERE! Although she used scrapbook paper, I wanted to try something different and used some magazine pages that had bright colors on them. I've seen so many different versions and ways to make paper roses... I'll get around to those another day :) Now go make some roses! 


Monday, May 10, 2010

Cute monogram plaque


For mothers day i made this monogram plaque for my mom because I noticed she didn't have any in her home. Hello? Who doesn't have a monogram in their home!? I have like 10. So... i set out to fix this problem ;) It was really fun and super easy (My favorite)! I did this in one night while my husband had a boys night out with his brothers and saw Iron Man. Uhh... I don't know why I'm even telling you this haha. Oh well, enjoy!


Supplies needed:

Wood plaque (I got mine at Hobby Lobby)
Scrapbook paper
Modge podge
Paint brush
Black acrylic paint
Your choice of acrylic paint for the top coat
Sanding block
Vinyl letter (You can even use a wood letter or a big chip board letter... that would be cute!)
Tulle & Ribbon 
Distressing ink (optional)


1. Paint plaque with the bottom coat- I chose black cause that's the color i wanted showing after I sanded the edges a little. Only paint the edges since that's the only part that will show.


2. Paint the top coat


3. Apply modge podge & apply paper. Apply modge podge over the top.


4. Sand the edges.


And whalla! 


Thursday, March 11, 2010

St. Patricks Day "Lucky blocks"


Lucky Blocks


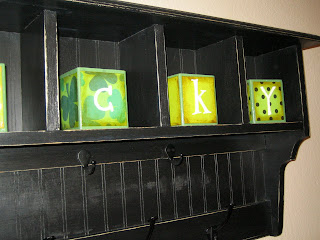
This project was super fun, easy, and a little time consuming... only because my baby was jealous of all the attention these blocks were getting! I've never decorated for St. Patricks Day in the past, but after seeing all these cute ideas in the blogging world, I figured this was a great excuse to make some cute blocks :)


Supplies I used:

4x4 cut up into 4 in. cubes ( The nice man in Home Depot cut them for me :))
Rust-oleum Leafy Green spray paint

Cute scrapbook paper
Modge Podge
Time Holtz Brushed Corduroy Distress Ink
Folk Art- Buttercream acrylic paint
Chip board letters
Paint brush
Sponge brush
Glue gun

Steps:

1. Cut up wood

2. Spray blocks
3. Cut up paper
4. Distress edges with ink

5. Apply Modge Podge to blocks and then apply paper. Smooth out bubbles. After it's dry, apply Modge Podge over the entire block.

6. Paint letters & let dry. Glue letters to block.

That's it! Have a good day! :)


I'm linking up Kimbas DIY day @ A soft Place To Land 


Saturday, March 6, 2010

"G" letter meets Jute Twine!

I have to admit, I didn't come up with this idea. I saw it on someones blog but for the life of me I can't remember who's blog it was so I can't give them credit for it...  Sorry! 

I had a "G" letter that I've had for awhile but wasn't too fond of it. So instead of painting it, I figured I would do something different! Therefore....  ugly colored letter meets jute twine... and walla! Simple! Basically I just wrapped the twine around the letter and used a hot glue gun occasionally to make sure it would stay in place. Cute, no?


I'm linking up to the wonderful DIY day at Kimbas A Soft Place To Land


Wednesday, February 17, 2010

Koston letters and wall plaques

For my sweet baby boys room I made these letters and wood plaques to hold them. It was very SIMPLE! If I can do it, ANYONE can do it :) 


(My mom made the bedding. She did an amazing job!!)

For the wood plaques I used:
  • Oval wood plaques (I got mine at Hobby Lobby) 
  • Rustoleum Espresso Spray paint
  • Rustoleum Heirloom white spray paint
  • Hooks (1/2 off at Hobby Lobby!)
  • Sanding block/sand paper
1. Spray Paint the edges with the Espresso spray paint. I only did the edges because that's where the distressing would be. Let dry.
2. Spray paint over the espresso with Heirloom white spray paint. Let dry.
3. With sanding block, lightly sand the edges so that the Brown shows through :)
4. Attach cute hooks to plaques... and wallaaa!! Easy peasy.

For the letters I used:
  • Cute wood letters from Hobby Lobby
  • Fun scrapbook paper
  • Modge Podge
  • Exacto knife
  • Sponge brushes
  • Tim Holtz distressed ink pads (love these!)

1. I traced out the letters onto scrapbook paper and then with my exacto knife I cut the letters out. 
2. Apply Modge Podge to the letters 
3. Apply paper. Make sure to smooth out all air bubbles. This is critical! :) Let dry.
4. With distressing ink, lightly dab the edges with either a sponge or, if you're impatient like me, i grabbed toilet paper and just dabbed it with that, haha.
5. Modge podge over all of it and let dry.
6. Attach ribbon to the back. I just glued it with my glue gun.

and... that's it!

I'm linking up to Kimbas DIY day AND "Get your Craft on" with Today's Creative Blog